
Having extensively used Concourse CI (https://concourse-ci.org/), Jenkins (https://www.jenkins.io/) and Gitlab CI (https://about.gitlab.com/stages-devops-lifecycle/continuous-integration/) for various different situations in a work capacity, I decided to try something new with this blog, Github Actions!
With Github now having unlimited free private repos, and allowing one to use their actions platform for free (with some limits) - it seemed fitting to try and keep the codebase, as well as deployment infrastructure in the same place, without the need for an external CI/CD platform to manage this.
The primary goal here is to allow me to easily update/modify and deploy the containers that run this blog, without too much need for manual copying of files, and manual deployment commands to get things going.
The Overview
As you probably already know, this blog has 2 (pretty simple) main components:
- Ghost - the blog platform - https://github.com/TryGhost/Ghost
- Traefik - the load balancer - https://github.com/containous/traefik
These components both run inside a very small instance from Scaleway - https://www.scaleway.com/en/
The instance itself is the smallest instance that Scaleway offers, with a very basic installation of Docker, set up in Swarm mode.
This means that getting the entire blog running, is simply a case of running a docker stack deploy command on the host, with the correct compose file, and voila! Running services:
ID                  NAME                MODE                REPLICAS            IMAGE
jicdlg04q0kr        blog_blog           replicated          1/1                 ghost:3.14.0
tllrpx689nzh        blog_traefik        global              1/1                 traefik:1.7.20-alpine
The Problem
While this is a pretty simple setup, if I, for example, wanted to update the version of Ghost or Traefik that I am running, I need to manually edit the compose file sitting on the host, and then redeploy things, not so nice!
So, I set about finding an easy (hopefully free) way to deploy this stack, with minimal input from my end, and minimal effort.
The Solution
Enter Github Actions! I’m not going to go into too much depth about exactly what Github Actions can do, but essentially it is a CI/CD platform built into Github, that allows you to automate workflows based on Github events. You can read more about it here: https://github.com/features/actions
Once I had decided to use Github Actions, I went about figuring out how it was set up and configured. Finding that it is pretty easily set up and configured with YAML files in the repo, I created a new workflow YAML which would be triggered on any merges into the master branch of this blog’s codebase on Github. Since the blog is run and maintained by just me, this made the most sense.
I wanted to achieve this workflow with as little effort as possible, so I kept the steps in this as simple to understand as possible.
The workflow consists of 3 simple steps, I’ll show what happens in each below:
1 - Check out the code
This is simple, we need to check out the code, to have the compose file we need to deploy available. this is done with the following section in the deploy YAML file:
    - name: Checkout Codebase
      uses: actions/checkout@v2
This is a step provided by Github that handles this checkout automagically for you.
2 - Copy the compose file to the remote host
To achieve this, I used a github scp action, readily available here: https://github.com/garygrossgarten/github-action-scp.
The deploy YAML file section that controls this looks like the below:
    - name: Copy Compose file to remote
      uses: garygrossgarten/github-action-scp@release
      with:
        local: ${{ secrets.COMPOSE_FILE_NAME }}
        remote: tmp/compose.yml
        host: ${{ secrets.HOST }}
        username: ${{ secrets.USER }}
        privateKey: ${{ secrets.KEY }}
There are a few things happening here. Essentially this step takes the compose file defined and copies it to the path tmp/compose.yml on the remote host. However, as I don’t want any secrets, or variables that could be compromised in the YAML file itself, I have chosen to get all the variables required from the secrets that one can define in the Github Repo. These secrets can be set and managed in the following path: https://github.com/USERNAME/REPO/settings/secrets. You will see this pattern throughout the file in this article.
3 - Deploy the stack on the remote host
Now that we have all the variables available that we need, and we have the compose file for deployment available on the remote host running the blog, we can issue the command to deploy the docker stack.
This command needs to take place on the remote host itself, so again, a handy, pre-existing Github Action was available to use, namely: https://github.com/appleboy/ssh-action
This action essentially just allows us to execute SSH commands on any remote host. Knowing this, I declared the following block in the deploy YAML file:
    - name: Deploy stack on remote host
      uses: appleboy/ssh-action@master
      env:
        AWS_ACCESS_KEY_ID: ${{ secrets.AWS_ACCESS_KEY_ID }}
        AWS_SECRET_ACCESS_KEY: ${{ secrets.AWS_SECRET_ACCESS_KEY }}
        AWS_HOSTED_ZONE_ID: ${{ secrets.AWS_HOSTED_ZONE_ID }}
        COMPOSE_FILE_NAME: ${{ secrets.COMPOSE_FILE_NAME }}
      with:
        host: ${{ secrets.HOST }}
        key: ${{ secrets.KEY }}
        username: ${{ secrets.USER }}
        envs: AWS_ACCESS_KEY_ID,AWS_SECRET_ACCESS_KEY,AWS_HOSTED_ZONE_ID,COMPOSE_FILE_NAME
        script: |
          AWS_ACCESS_KEY_ID=${AWS_ACCESS_KEY_ID} AWS_SECRET_ACCESS_KEY=${AWS_SECRET_ACCESS_KEY} AWS_HOSTED_ZONE_ID=${AWS_HOSTED_ZONE_ID} docker stack deploy blog -c tmp/compose.yml
          rm -rf tmp/compose.yml
Again, there is quite a bit going on here, but essentially we are just executing docker stack deploy blog on the remote host. Which deploys/updates the relevant containers on the remote blog host, as I expect. After which we remove this compose file so that we clean up for the next time the workflow runs.
The rest of the items in this code block, are populating relevant Environment Variables to the action step, and then feeding them to the remote host, so that the docker stack deploy command has the relevant environment variables available.
These variables are also declared in the docker-compose file that is deployed, which is in turn populated to the relevant service containers. They are declared in the following way, under the service that requires them:
    environment:
      - AWS_ACCESS_KEY_ID=${AWS_ACCESS_KEY_ID}
      - AWS_SECRET_ACCESS_KEY=${AWS_SECRET_ACCESS_KEY}
      - AWS_HOSTED_ZONE_ID=${AWS_HOSTED_ZONE_ID}
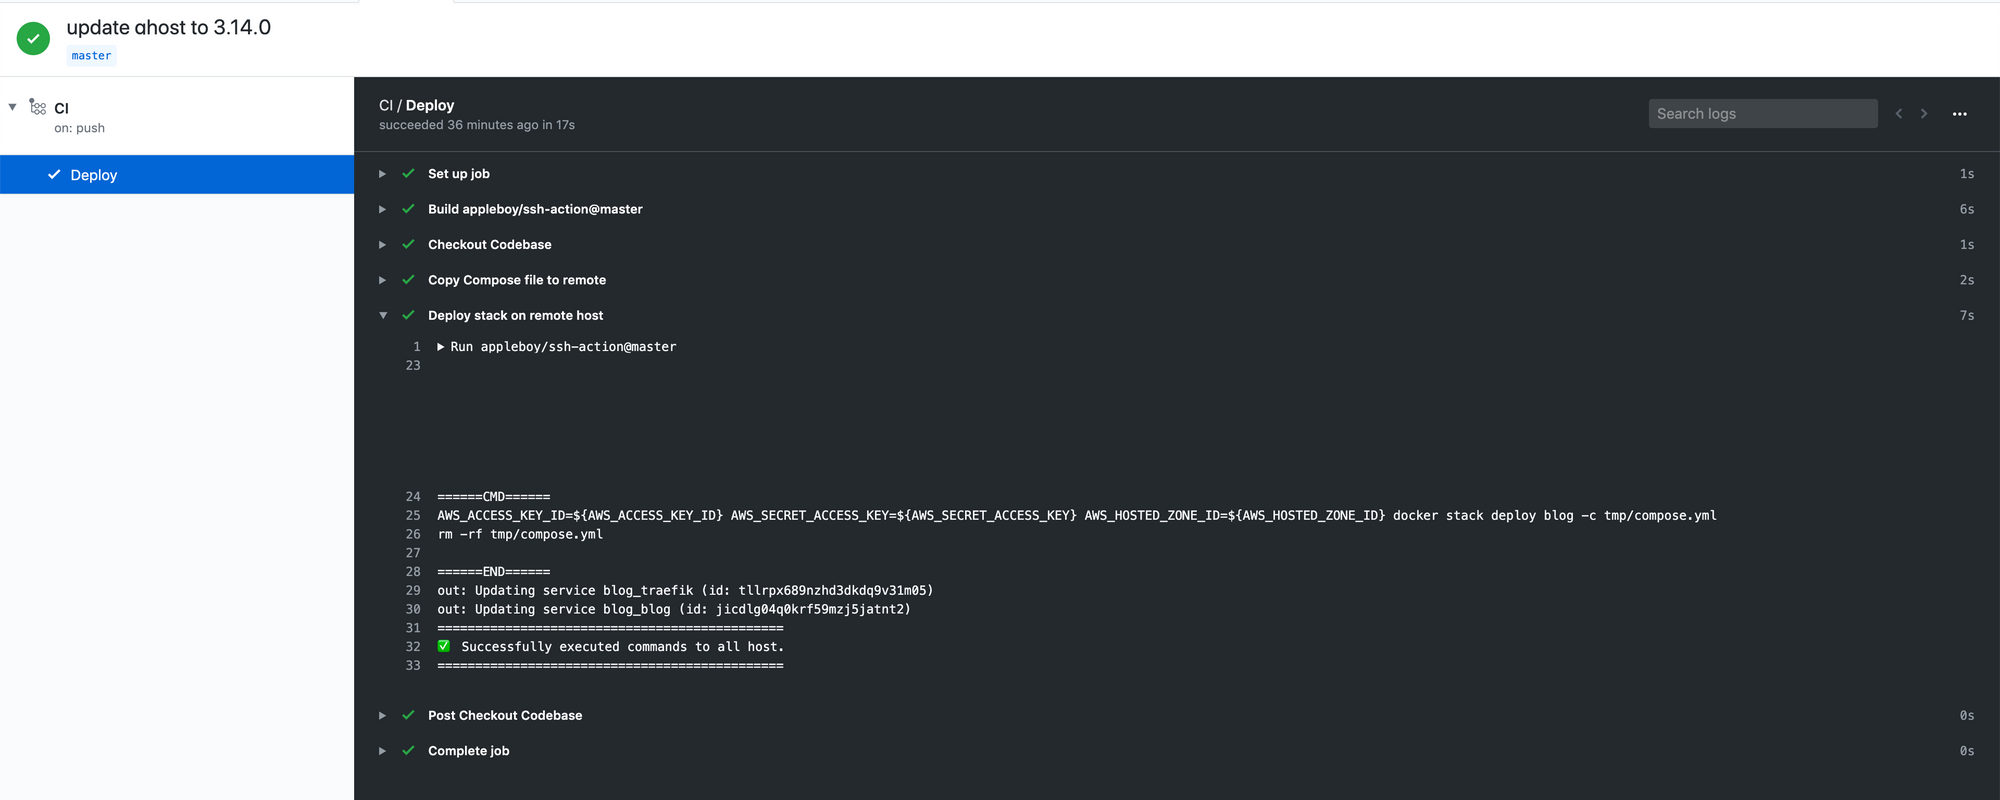
The Results
And there we have it! We’ve successfully set up a Github action that deploys this blog’s docker stack upon any changes being merged into master. One step closer to having a fully automated setup!
Here we can see a change that I made to master, to update the version of Ghost being run:
The Conclusion
This was a very quick and easy setup, and went from a totally manual deployment, with credentials sitting on the host itself, to having no credentials on the host, and variables properly contained in Github as expected. Even if this process and pipeline is not perfect, and does not cover every single use case, it’s still a pretty awesome demonstration of how free CI/CD platforms can greatly help individuals keep deployments as streamlined, fast and easy as possible.
Combining this pipeline with the docker-compose verification githook from the previous post (https://blog.devinsmith.co.za/validate-docker-compose-pre-commit/) we can build a fairly robust pipeline to ensure that these deployments are verified before they run, giving me piece of mind that the deployment will succeed and not error out!
-
For those specifically interested, the following is the specific file structure in the Github repo that houses the code shown above:
├── .github │ └── workflows │ └── deploy.yml ├── README.md └── docker-compose.yml
Notes
- Thanks to all the great people that have developed and published their Github actions, without them, this sort of thing would definitely take vastly longer to achieve!
- I am aware that the way that I am doing environment variable injection in the pipeline is not very robust, open to suggestions on how to improve it in the long run!
- I am using Unsplash for all the images on this blog - credits to Brina Blum for this posts header image:https://unsplash.com/photos/842ofHC6MaIhttps://unsplash.com/photos/Bb_X4JgSqIM
Thanks for reading! Hope you enjoyed seeing a bit more about how CI/CD works and what you can do for yourself to make your own life easier!
-Devin